Today everyone should have a blog. whatever blog is professional or personal it doesn't matter. many places provided to open a free blog account. but google BlogSpot is the best and popular place around the internet.Now Question why you need a custom domain. custom domain means your own buying domain.
For example, you can buy a domain for using your choice-able name or your own name youname.com. now you need to point this domain to your existing blog domain by replacing youname.blogspot.com to youname.com.
Now How you benefited with you own domain.In case, your hosted blog authority disable or remove your blog account for policy violent or any others reasons. if you are not using custom domain means your own domain then you completely lost your work and a visitor from this blog.
Additionally, if you have an own domain then no tension you can easily move your site and user everywhere.
Google Blogspot Custome domain is simply easy process if you know the proper process then you can easily setup with an own domain.Many beginners bloggers don't know the process setup domain with Blogspot.
In this article, I will show you the step to set up custom domain.I'm selecting hostseba.com domain.How to setup Blogspot Custome Domain with hostseba.com domain.
Setting Bloggers Custom Domain:
Step 1. Login to your Blogger account at www.blogger.com.
Step 2. Click on your blog and then go to "Settings", choose "Basic".
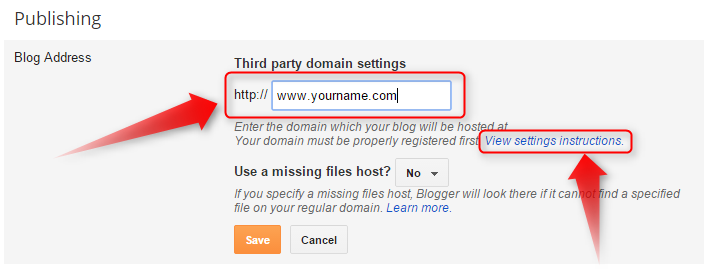
Step 3 Under "Publishing" section, click "+ Setup a 3rd party URL for your blog".
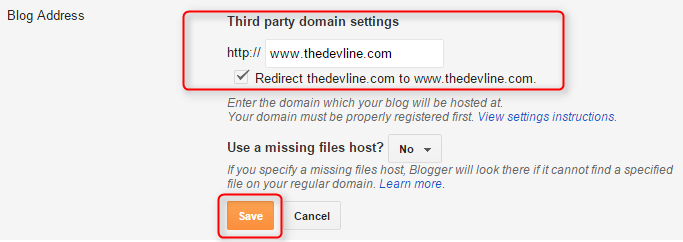
Step 4. Under "Third-party domain settings" next to "http://" type your domain that you just purchased and make sure that you don't forget to add the "www" prefix to the domain name.
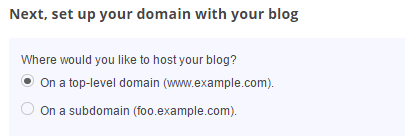
Step 5. Click "View settings instructions" to get the blogger's official instructions. On the Blogger instruction page, choose the "On a top-level domain (www.example.com)" option.
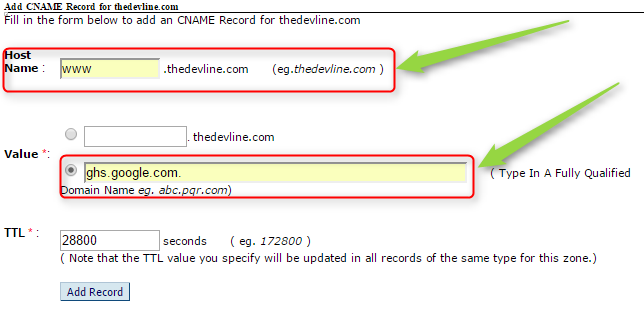
Step 6. Now log in your Hostseba Domain CP Here in DNS Management section click Management DNS after clicking Open new windows click CNAME Record
Below is the list of CNAME Records. Click the 'Add CNAME Record' button to add more 'CNAME' records.
Now you can successfully add CNAME Record. you Record CNAME look like a blow the image
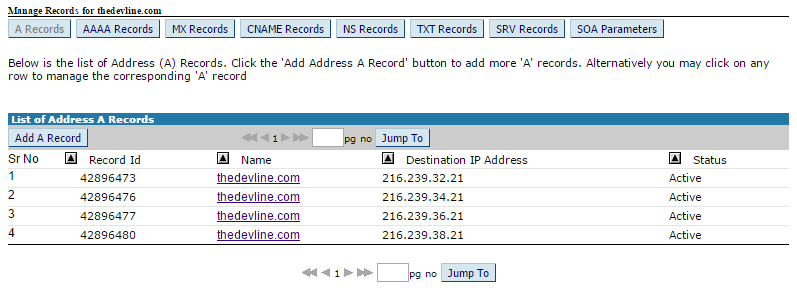
Step 7. Under the point 9 of instructions, 4 IP addresses will be given, copy and save all 4 of them.In the same Page Click A Records And Insert 4 IP Address on A Records Section Look Image Blow
If you have any existing recode under the domain then you need to remove the old recode only put here this 4 IP record. Now go back to Blogger and try to save settings again. The registration process takes 24-48 hours, so don't worry if you get an error again. Come again later to Blogger after 24-48 hours, repeat step, press Save, and the error should be gone.
Step 8. After your URL starts working, click on the "Edit" link next to domain name on setting page. Check the "Redirect... to..." checkbox below your site address to ensure that even if the visitors will miss out the www part, they will still be able to reach your site.
And that's it. Enjoy your new domain URL with your blog!
Conclusion
All blog's Domain Customization flow the same rules, Just implement process are different. by doing own domain customization, you need to understand A Records & CName Record first.

